If you’ve decided to take up cycling again, you might ask yourself, what bike should I get? The bike that we are about to describe is not expensive; it is a real workhorse that can carry a load and is as comfortable on city streets as it is on multi week tours and can do some light off-road riding:
Geometry:
- A “hybrid style” frame is a non-suspension type mountain bike frame designed for on road use. We both find this to be a good happy medium between a racing bike and a city bike.
- Racing bikes offer better speed (2-3 km/h more on average) while Dutch style bikes are very comfortable and practical for shorter distances.
- There are full size and traditional folding bikes that make bike travel combined with public transport easier if this is important to you.
- Unless you are doing medium to heavy off-road riding, suspension adds unnecessary weight and cost so don’t bother with it; good tyres will give you all the suspension you need.
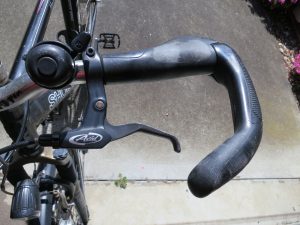
- We use flat bars because that’s what both of us are used to but we also have bar ends for extra hand positions on long trips which increased rider comfort. Drop bars are also a good option if that’s your thing.
Cost:
- We have no formal research to back this up, but in our experience, brand new bikes under $500 are not made well and are best for shorter regular trips (under 5km one way).
- Conversely, we have found that bikes priced over $2000 don’t offer enough of an increase in quality or performance to warrant the extra cost unless you are a professional racer or doing a serious expedition.
- $500 to $2000 is a good place to aim for. For this money, you can get a good quality hybrid bike with good brakes, tyres, lights, a saddle bag or two, a good quality pack rack and some wet gear.
- If maintained properly, such a bike should last for 10 years/40000 kilometres or more and can do all the commuting and touring that you desire within reason.
Tyres:
- Cheap tyres cost around $30 to $40 and will last less than 10000km while good tyres cost from $60 to $100 and will last from 10000-20000km so this is not an area to be cheap.
- Aim to have at least reasonable puncture protection for normal riding. If you regularly ride through industrial areas (with glass and metal on the road), you may need the best puncture protection you can get.
- We haven’t tried lots of different tyres but have found that Vittoria Randonneurs Hyper tyres are light, foldable, nice to ride on and still offer reasonable puncture protection for $60 a tyre.
- If you need the best in puncture protection and durability with a small trade off in performance, Schwalbe Marathon Plus tyres are hard to beat. They cost about $80 a tyre but can last beyond 20000km.
- For further puncture protection, latex sealant can be added to your tyre tubes. One of us uses a Marathon Plus/latex sealant combination regularly on industrial roads and has gone from one puncture every 1000km to none.
Brakes:
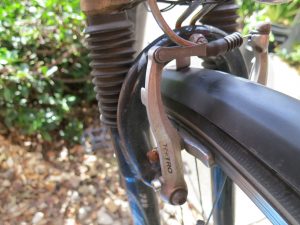
- We use V-brakes because that’s what our bikes have, they are pretty simple to set up, they weigh less and there’s very little to go wrong with them.
- If your brakes are of crap quality, you can easily upgrade to a better set that will improve braking performance without spending a fortune.
- Good pads also make a big difference and you can also get brake pads that improve wet weather performance.
- With good riding technique, brake pads can last a long time (up to 20000km): Use the front brake only for most situations and use the rear brake more in slippery conditions or when riding on loose surfaces.
- Hydraulic disc brakes are good for downhill mountain biking and riding in the mud but add needless complexity to the bike if you spend most of your time on the road or on bike paths.
Gears/drivetrain:
There’s no right or wrong answer here:
- Go with an internal gear hub if you are too lazy to maintain your driveline with trade-offs in performance and the ease of changing a rear tyre
- Go with a derailleur system for the best in weight and performance but spend more time cleaning and adjusting it.
- Or use a single speed/fixed gear bike if you only ride in flat areas and don’t mind more of a challenge in exchange for an almost maintanance free bike.
- Or come up with your own combination: one of us has a rear derailleur only and friction shifter (to avoid having to adjust gears) which makes the bike an 8 speed (1×8) for touring.
- We use 24 speed bikes and nothing more because 8 speed chains are easier to set up for gear shifting, they are stronger and cost less than 9-10 speed chains.
- The only maintanence we need to do is the occasional gear adjustment and oil the chain every 500km or so. We carry a couple of chain quick links and some spare chain links in case of chain failure (which hasn’t happened so far).
- We also use a chain elongation gauge to check when the chain has stretched too far and needs to be replaced (to avoid stretching the teeth on the front and rear cogs which makes them last longer).
Luggage:
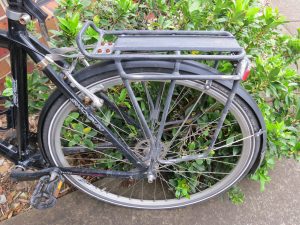
- Get a luggage rack and 1-2 waterproof saddle bags to turn your bike into a workhorse.
- Don’t skimp in this area as poor quality racks can flex under load (especially on fast downhill riding) which can be dangerous while they tend to break after a while.
- Same with bike bags; Good bike bags will last a long time and it’s nice to know that your change of clothes on a bike tour are dry after riding through a downpour.
Wet weather/hot weather protection:
- A motorbike wet weather suit serves as wet weather insurance for commuting. It’s reasonably light and if it starts raining heavily, it will keep your work clothes dry underneath.
- There are also various overshoes, wet weather jackets, etc. for cyclists. Whatever you use, a good set of mudguards is also helpful.
- As for hot weather, allowing a bit more time to get to work and going 2-3km/h slower makes a big difference in the effort that you need to put in.
- Know your limits in terms of heat and keep a bottle of water handy on the bike or consider riding in the cool of the day to avoid extreme heat.
- For very cold weather, a beanie fitted under your helmet, a scarf, spray jacket (for the wind), decent gloves and woollen glove inserts (if it’s really cold) can make riding more comfortable, especially for longer commutes.
Lights/accessories/safety:
- For commuting under street lighting, battery lighting is enough. Some battery lighting is now good enough for riding in total darkness.
- Good quality dynamo lighting is not cheap, but it will also allow for riding in total darkness without the need to recharge batteries and dynamos can be used to recharge phones on long tours when using GPS.
- If you are sharing the road at night with motorists in areas where they may not be as familiar with cyclists or are travelling at high speed (over 60km/h), wearing a hi-vis vest can help make you more visible and easily zips up over your clothes.
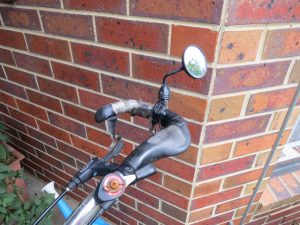
- A mirror on the right side of the handlebars is useful for monitoring approaching traffic from behind (or the left side if you live in a right hand drive country).
Maintenance/Commuting cost:
We spend about 4 hours a year maintaining each bike based on the above equipment choices and here’s why:
- Our drivelines need very little maintenance outside of occasional gear adjustment, chain oiling, checking chain elongation and chain replacement. Every two years, gear and brake cables are replaced.
- Through good braking technique, we rarely need to change or adjust brake pads. When we do change brake pads, we give the brake bosses a bit of grease to make adjustment easier.
- Good tyres mean few or no punctures so all we need to do is to top them up with air every few weeks. A good floor pump is worth the money because it makes this job much easier.
- Using mudguards prevents dirt from getting flicked onto the bike and only oiling the chain when it needs it prevents dirt from sticking to the driveline components, so our bikes never need to be cleaned.
- We have learnt to check things regularly so that little problems can be fixed before they become big problems. As you gain experience, you’ll learn what tends to fail on a bike and how to hear or see this before it happens.
- A set of tools to cover most home repair jobs cost less than $200 and will make you independent of the bike shop. You can also keep some spare parts that you know you will need in the future. We haven’t used a bike shop in 6 years.
- Our bike commuting costs around $0.10 a kilometre or $500 a year per person.
With the right choice of equipment, biking can be a really enjoyable experience without breaking the bank. Learning to maintain your bike will also give you greater independence with the ability to fix almost any breakdown on the roadside which will rarely happen if you maintain your bike well.