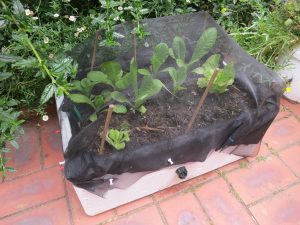
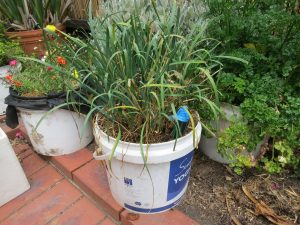
A wicking bed is a self-watering container. Renters can build simple, portable wicking beds for $5-$10 each using recycled containers or buckets and can grow fruit and vegetables using half the water (and effort) compared to conventional pots.
How does a wicking bed work?
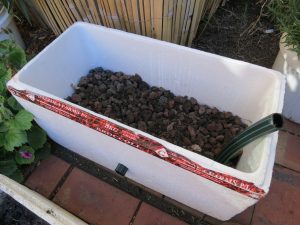
- A wicking bed has a water reservoir at the bottom (usually no deeper than 30cm) that is filled with a “filler” material like scoria or gravel to support the soil above (which is also usually no deeper than 30cm).
- There’s a filler pipe that goes down the side of soil into the reservoir below to allow for refilling.
- At the top of the reservoir, there is an outlet pipe to let out excess water to prevent the soil from getting waterlogged during heavy rainfall.
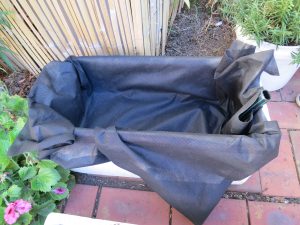
- The soil and “filler” material are normally separated by a geotextile material to prevent soil for clogging the reservoir. This material must allow the water below to permeate through to the soil.
- Wicking beds work by drawing moisture up through the soil via a process called capillary action or wicking which is why the water reservoir or soil shouldn’t be deeper than 30cm.
- Wicking beds are very water efficient as the water is drawn from below which prevents evaporative losses, especially if you cover the soil with mulch in the warmer months.
- Be aware that some plants that like dry soils (like Mediterranean herbs or citrus) don’t do well in wicking beds.
How to make a portable wicking bed:
You’ll need:
- A recycled polystyrene container or food grade bucket (10-20 litres, depending on the plant size) which can be found for free from supermarkets, restaurants and take away shops.
- 1 inch poly pipe ($1-3 a metre) and an elbow joiner ($2 each).
- Roughly one square metre of geo textile weed mat ($1 a square metre).
- A bag of scoria.
- Some good quality soil mixed in with compost.
- Pea straw or an alternative organic mulch.
How to make one:
- Measure and cut a piece of poly pipe so that it reaches 3-5cm above the container you’re planning to use allowing for the elbow at the bottom.
- Measure and cut a piece of poly pipe from the elbow joiner to extend two thirds of the way across the wicking box or bucket.
- Attach both pieces of pipe to the elbow joiner.
- If you are careful, you can use a hammer to force the poly pipe over the elbow joiner otherwise you can use hot water to make the pipe more malleable to slide over the elbow joiner.
- For the poly pipe that will sit across the bottom, drill an 8mm hole every inch to help spread the water evenly when filling with a hose.
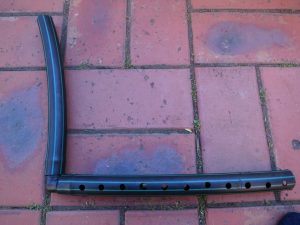
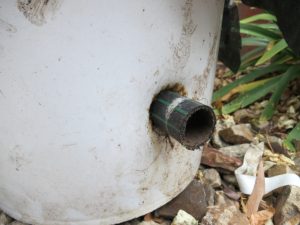
- Cut a 5cm piece of poly pipe for the drain hole.
- You’ll need to make a hole in your polystyrene box or bucket for the drain pipe depending on how deep you want the reservoir to be.
- For a polystyrene box, you can gently force the poly drain pipe through to make a hole
- For a food grade plastic bucket, use a drill with a hole saw to make a hole that is slightly too small for the poly pipe, then use a knife to cut some 5mm slits around the hole and from there the poly pipe can be forced through to sit snuggly in the hole.
- Position the filler pipe (ideally so that it sits on the left or right side of the box/bucket while the drain pipe is at the front to make refilling easier) and fill the box/bucket with scoria to the level of the drain pipe.
- Cut roughly a square meter of geotextile and place it in the box/bucket so that it rests on the scoria and drapes over the sides of the box/bucket.
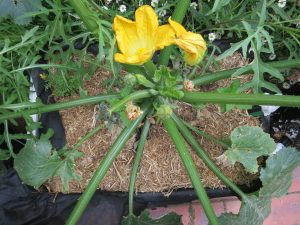
- Fill the rest of the box/bucket with a mix of 2 parts soil to one part compost, plant your seedling/s, put mulch around the seedling/s, place the box/bucket in your desired location and fill the reservoir with water.
Extra tips:
- You can use a hose with a jet nozzle attachment to make refilling easier.
- In a temperate climate like Southern Australia, you should hardly need to refill your wicking containers in winter whilst in summer this could be as often as every two weeks to every two days depending on the weather and how thirsty a particular plant is.
- Polystyrene boxes can hold roughly 5 litres of water and need two people to lift while 10 litre wicking buckets can hold roughly 2 litres of water and can be moved by one person.
- You can use store bought potting mix though it is easy to make your own with a 2 to 1 mix of a well-draining topsoil and good organic compost.
- Use old bits of scrunched up plastic to block the filler and drain pipes to prevent slugs from making a home in there.
- It costs roughly $50 a square metre to make a portable garden with wicking beds and buckets from mostly recycled materials and homemade potting mix whilst the cost increases to $100 per square metre if you buy potting mix.
- If you can find free scavenged shade cloth (instead of geo textile), a free source of scoria and scavenged poly pipe and joiners, you could make your portable garden for free.
Making your own wicking boxes and buckets is easy once you’ve done it a few times. We built 4 square metres of garden for $200 that supplied 15% of our total produce needs for the year (all our greens, herbs and some vegetables, all organic) with no noticeable increase in our water bill.