Menu image: Amy Piesse Photography
The average Australian household sends 600kg of organic food and garden waste to landfill each year that can be turned into valuable fuel for your garden [1]. Renters can take advantage of this by building a portable composting system.
First, let’s look at some basics of composing:
- Compost needs four ingredients to turns your waste into valuable organic matter for your garden: Carbon, nitrogen, oxygen, water and microbes.
- High carbon materials tend to be brown and dry, for example wood, paper and leaves while nitrogen materials tend to be green/colourful and moist, for example banana peels or tea leaves.
- We tend to use a ratio of roughly 50/50 carbon to nitrogen as we have an excellent supply of sawdust from untreated timber which breaks down quickly.
- You’ll have to see for yourself what mix works, but generally your compost should be at least 50% carbon. Some compost piles use as much as 40 parts of carbon to one part of nitrogen.
- Your compost needs to breathe otherwise it will go anaerobic and really smell.
- It should feel like a damp sponge to touch. Any drier than this, you should add water and any wetter, you should add carbon to soak up any excess water.
- Introducing soil microbes into a new compost pile is easy: just add some soil or some finished compost from another pile.
Things you can put in the compost (C=carbon source and N=nitrogen source):
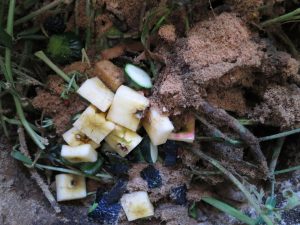
- Greens from the kitchen or food scraps (excluding meat and fish, see below) (N).
- Garden waste and grass clippings (N).
- Horse, cow or sheep manure (N).
- Tea and coffee grounds (N).
- Shredded newspaper and cardboard (C).
- Sawdust and very small branches (cut up larger ones if need be) (C).
- Ash and charcoal from a fire or wood heater (provided the timber burned was untreated) (C).
- See more in this list of 100 things you can compost on the Small Footprint Family website for more ideas.
Things that should not go in the compost:
- Dog and cat manure (especially for food gardens, it can contain microbes you don’t want in the food you grow).
- Tea and coffee bags (if they are synthetic material, they won’t compost).
- Citrus and onion peels (the odd one is ok, but not too many as they will take a long time to compost).
- Eucalyptus leaves (they take too long to compost and may be detrimental to some plants).
- Fish and meat scraps (they can make a compost pile smell bad and attract rodents).
- Glossy paper (won’t compost properly and contains toxins).
- Sticky labels on fruit and veggies (they don’t compost).
- Coal fire ash (often contains nasty chemicals).
- Sawdust from treated wood (can contain nasty chemicals from pressure treatment, stain, varnish or paint. Do not use unless you are certain the wood treatment was 100% organic and is safe for composting).
- Large branches (take too long to compost, cut large branches into smaller pieces).
- Synthetic fertilisers (they do damage to helpful microbes in your soils).
Portable composting
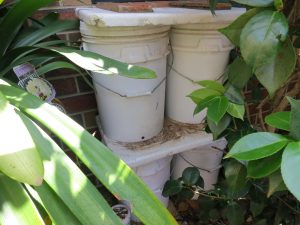
You can make a simple outdoor composting system for $20 using recycled food grade buckets that will only take up minimal space in your garden.
This system is easy to move to a new home without disturbing the compost or making a mess.
Our composting system can handle enough fruit/vegetable/garden waste for a single person to small family household and should generate a 20 litre bucket of compost every 2 weeks depending on the time of the year in a temperate climate like Melbourne.
Making the compost system:
- Obtain 5 recycled food grade 20 litre buckets with lids (you can always add buckets later if you want more composting capacity). Food manufacturers often give these away.
- Do not use discarded 20 litre buckets from building sites as they may contain toxic materials that you wouldn’t want in your garden soil.
- Drill four drain holes on the side at the very bottom of each bucket using an 8mm drill bit. This is small enough to stop rodents from getting in but will allow for worms to get in to help the composting process along.
- Drill lots of ventilation holes in each lid (say 20) using a small drill bit (2-3mm).
- Find a place to store your compost buckets, ideally outdoors and undercover.
- If you don’t have an undercover area, you can use an object to cover the tops of each bucket as long as it doesn’t block the ventilation holes on the bucket lids (see photo).
- Whatever surface the buckets rest on, keep in mind that the buckets can leach a little water from the drain holes which may stain certain surfaces. For this reason, we rest ours on dirt, gravel or lay a plastic sheet underneath when we want to prevent surface stains.
- Obtain 2 recycled 10 litre food grade buckets and find a place for them in your kitchen. These will be used to collect your food scraps and can be had for free from restaurants. Leave a measuring cup in one of them.
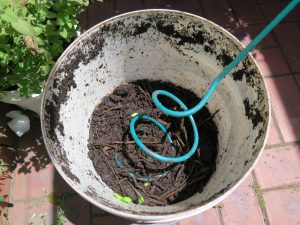
- Get a compost screw if you don’t have one already. They cost $20, will save you a lot of effort and don’t take up much room.
Using the compost system:
- When set up properly, you should only need 15 minutes a week to use this composting system.
- Fill one of your kitchen buckets with a mixture of a carbon source (sawdust, shredded newspaper, leaves, etc.) and some dirt or finished compost for microbes.
- Fill your other kitchen bucket with food scraps as you produce them. When you have a layer of food waste, add a few measuring cups of your carbon source to cover your food waste and then add a half cup of water.
- Continue this process until the bucket is full or you have reached one week, whatever comes first.
- Empty the kitchen bucket into the outdoor compost bucket with the newest compost or start a new bucket if the others are full.
- Give your compost a turn with the compost screw each week; 3-4 turns per bucket should be enough.
- If any bucket is too damp, add some carbon and turn with the compost screw to mix it in. If a bucket is too dry, add some water then turn the compost with the compost screw.
- You may see a few worms in your compost or some vinegar flies; if this is the case, take it as a compliment as this means your compost is going well.
- Another way to see how your compost is going is by its smell: it should have none or almost no odour, rather a nice fresh “rainforest floor” type smell.
- If your compost smells, give it turn, check the moisture level, carbon/nitrogen level or off there’s any excess water at the bottom of the bucket.
- When your compost has no visible food scraps, has a fresh “rainforest floor” smell and looks like a nice crumbly brown/black soil, it’s ready for the garden.
- Mix your finished compost in with your garden soil or use it to create potting soil.
Worm composting as an alternative:
- Another space saving and highly portable form of composting is worm composting which we used in Germany with success (unfortunately we have no photos of the process).
- You can find more information about worm composting at the bottom of this My Smart Garden article on composting plus there’s heaps of other information online.
Once properly set up, the above composting system is a set and forget system that should produce up to half a ton of compost a year for just 15 minutes of your time each week and should cut the amount of waste your household sends to landfill in half.
Further Reading:
[1] https://theconversation.com/capturing-the-true-wealth-of-australias-waste-82644